 |
| Why buy one spool when you can buy 20? |
My thread has arrived so pants pocket repair will commence tomorrow. I had no idea just how complicated pants are to make. Although, now that I've really torn into a pair, it's not all that bad. The trick is knowing what order to sew stuff together. I reverse engineered my pocket, took notes, drew some pictures, and then tried pinning parts together.
 |
Notes and thread, with the original pocket bag
|
You can see in the photo that I tried just re-sewing the original seam along the edge of the pocket, which sort of worked but then you can also see that there was another hole which needed to be patched. Darning may have worked but I have not really tried darning. Ultimately, I decided that the only real solution was complete replacement of the pocket. It has been a very educational project.
For starters, I learned a little about fabric selection. Initially I was tempted to use the toughest, most durable fabric I could find - like Cordura Nylon or old fire hose material or something like that. No doubt I could carry my pocket knife in the open position and not have to worry about wearing a hole in a Cordura pocket. But, it's worth considering that a front pocket bag rubs against your thigh. Cordura isn't the most comfortable fabric out there and it's sort of stiff. The original pocket in my pants was a lovely, soft cotton. Felt very nice against my skin. Unfortunately, it was a very thin fabric and not durable at all.
There's a balance between comfort and durability when it comes to pockets which I had never considered before. Besides being durable, you also want a fabric that will protect your skin from whatever you carry in your pocket. Like keys. Sometimes even nails or screws. Rocks. Etc.
 |
| The replacement pocket with reinforcements sewn on |
I opted for some knit material I bought a long time ago to patch a hole in a pair of my wife's slacks. It's fairly thick but very flexible and obviously somewhat comfortable since they make entire pairs of pants out of it. We'll see if I made a good choice.
Another lesson learned already on this repair project: basting is your friend! Or just pinning. At some point I got a little overly enthusiastic and sewed a couple of pieces together before I really knew what I was doing. Naturally, I also used a tiny stitch length, so when I had to tear all that stitching apart I had to work extra hard at it. A good basting stitch would have allowed me to figure out how things needed to be put together without a lot of unnecessary seam ripping. I won't forget that in the future. More on pockets and this repair tomorrow or later this week.
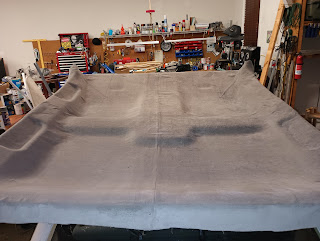 |
The headliner is glued down!
|
This afternoon I got inspired to finish gluing down the faux suede on the headliner shell for my truck. If you don't look close, it doesn't look too bad. Another lesson in fabric selection here. You can see all the compound curves and recesses I was working with. I actually thought ahead on this and chose a fabric which seemed to have enough stretch to force into all these little curves. That didn't work out exactly as hoped and I've got a handful of spots where the fabric just didn't stick to the shell. I'll have to figure out a way to get those spots flattened out. I may just sew the fabric down to the shell. I had to make some relief cuts at the corners because those spots were just too complex for the fabric to stick. I'm not super happy with how it turned out, especially because my seam isn't centered on the headliner shell, but I'll make it work somehow. I guess for a first effort it turned out alright. I'd give it a C.


No comments:
Post a Comment